SCORM Engine Console Overview
Welcome to Engine!
As an Engine customer, you'll have access to our development staff during the initial integration process and for as long as you maintain a current license. You'll also have access to tools that we hope will assist you for as long as you run Engine.
This document is geared toward what you'll see after the integration kickoff call, but the technologies covered will be available to you in your Engine installation for the duration of your use of the software.
As of the latest major release of Engine, we now offer a console to Engine. From the console, you can:
- import and launch SCORM, AICC, and Tin Can content
- review registrations and launch history
- see basic diagnostics for your Engine environment
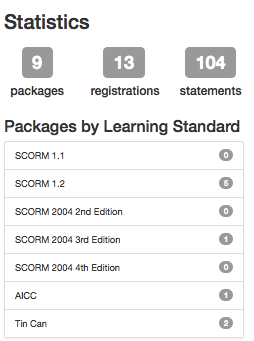
- get basic statistics about your use of supported learning standards
- get a snapshot of key integration details
- execute some basic database functions
- access a basic Tin Can statement viewer
- manage OAuth consumers
- run reports for Software user counts
By the time you're done reading this document and following its prescriptions, we want you to be able to use the console to import and launch content in a fully functional Engine integration. First, we take you through an overview of the Engine console. Then we tell you how to get yours up and running as you embark on the actual process of integration.
As you read and complete each step of this second portion of this document, you can track your own progress in the console dashboard. First you'll start seeing green lights in the self-test health check up. Ultimately, you'll be able to import and launch content.
Have fun!
(And be sure to let us know what could make this process better and more fun if you don't...)
Engine Console: How It Should Look
Pictured here is a screenshot of the Engine console dashboard running against a very basic integration for a sample customer called Vanilla:
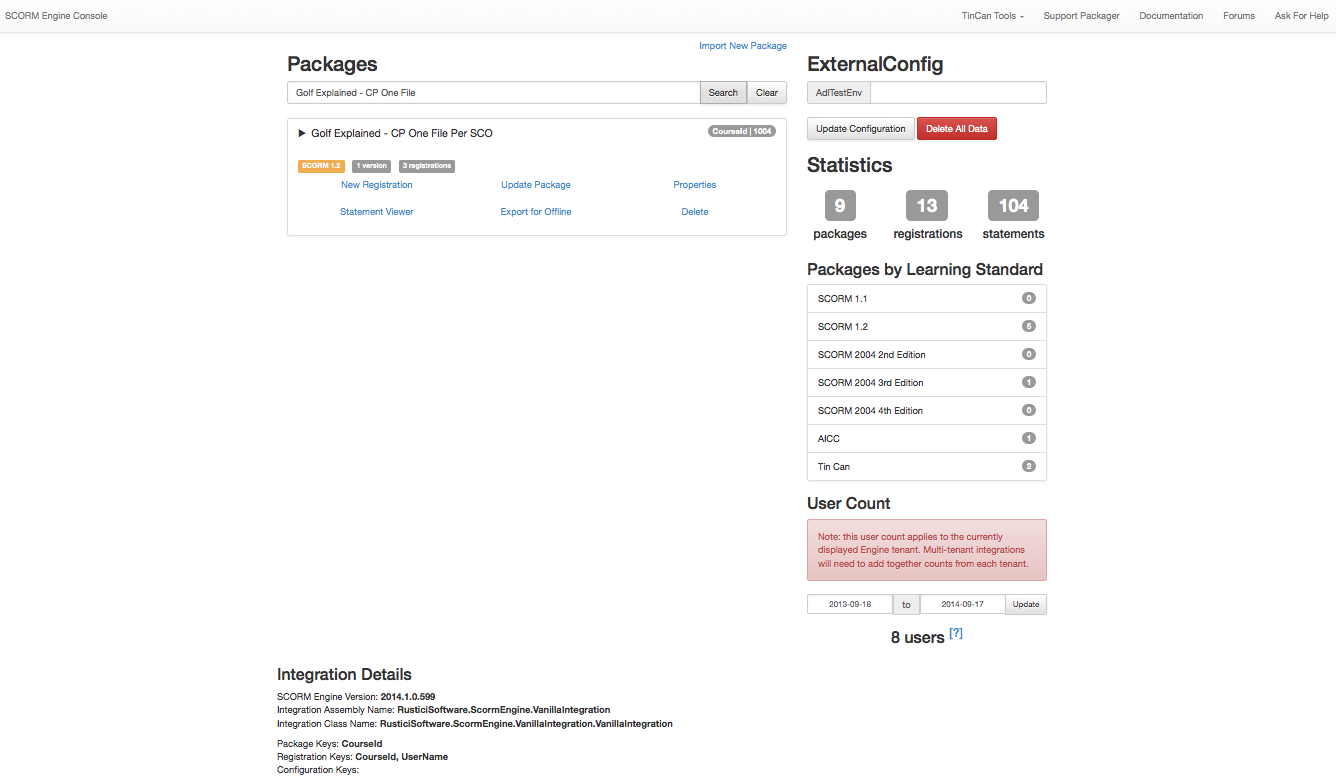
Import and Launch
You can see that we've imported into this instance of Engine one of our golf sample courses. Console also provides a breakdown of the number of courses by learning standard imported into your instance of Engine
User Count
We have included a simple to use method to collect user counts for the number of users within the SCORM Engine tables. Many of our licenses require an annual report of the number of users and this tool should help you easily locate that user count. You can enter dates to only report the users within a certain timeframe. Note that for multi-tenant integrations you will need to run this method for each tenant and then report the aggregate number to Rustici Software each license anniversary.

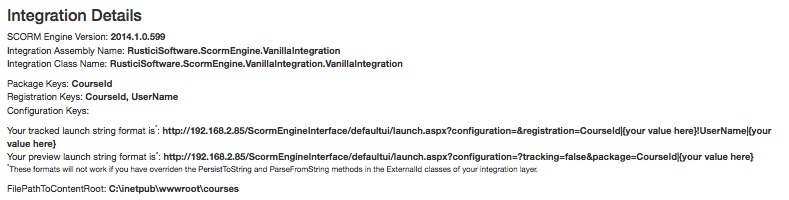
Integration Details
Under Integration Details at the bottom, you can see the version of the Engine software. You can also see that we've specified an external package key of CourseId, an external registration key of CourseId and UserName, and no external configuration keys. Finally, you can see how your launch URLs will look.
Web Server Configuration
The final section on the console dashboard is for the SCORM Engine Settings values relevant to successful operation of Engine. We display configuration settings as key/value pairs.

How You Can Have a Console of Your Very Own
In order to get to this point, we had to complete the basic integration process, which involved three steps:
- running the Engine database script
- making some basic changes to the Engine web server configuration file
- implementing core overrides in the main integration file
.NET users have a slight advantage in that the comprehensive environment available in Visual Studio allows for console to be played directly in debugging mode right from Visual Studio rather than having to navigate to its URL via a web browser. If you want to access console directly, however, it's also available at /ScormEngineInterface/tools/console/.
Configuring Your Database for Use with Engine
As part of our delivery, we include a SQL file containing data definition language (DDL) statements (e.g., CREATE TABLE, etc.) for the Engine data model.
You'll need to execute this collection of SQL statements in the DBMS (e.g., SQL Server, MySQL, Oracle, PostgreSQL) you're using with Engine. In our Vanilla example, we're using SQL Server. You'll find the SQL for your DBMS in the Database folder in your Engine folder. Each DBMS has its own subfolder.
You should only need to run this SQL once for each instance of Engine.
Configuring Your Web Server for Use with Engine
We include a web server configuration file specific to Engine: SCORMEngineSettings.config. You'll need to update this configuration file to get both Engine and the console working.
This first round of settings will be in the <appSettings> block of SCORMEngineSettings.config.
Controlling Access to Console
Console is your gateway to Engine. It includes both information and controls that you probably don't want the entire world to see, so we protect it with an authentication mechanism that uses a combination of a configuration key and a cookie.
The very first time you try to access console, it will look like this:
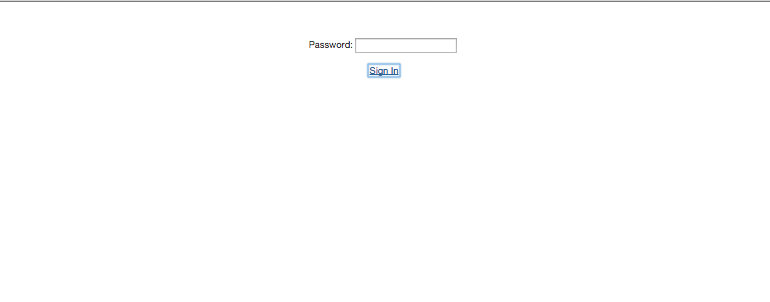
That password is governed by the ConsolePassword entry in your config. In the appSettings block, you'll want an entry like this:
<add key="ConsolePassword" value="YourChosenPassword"/>
After you've authenticated successfully, console will set a cookie, and you will be able to bypass the login prompt and get straight to the dashboard.
If you ever want to disable access via a given browser that has previously authenticated, you'll need to delete the SECONSOLE cookie.
Getting Engine Talking to Your Database
In SCORMEngineSettings.config, we need to specify the connection details for the database set up in step 1. We'll need to adjust the entries for DataPersistenceEngine and DatabaseConnectionString. In our example, we use these values:
<!-- Data Persistence -->
<add key="DataPersistenceEngine" value="sqlserver"/>
<add key="DatabaseConnectionString" value="server=localhost;uid=sa;pwd=notarealpassword;database=se2011.1.0"/>
DataPersistenceEngine just specifies the DBMS being used (i.e., sqlserver, mysql, oracle, or db2). The DatabaseConnectionString needs the basics for a database connection: a hostname, a user ID, a password, and the name of the database where Engine will live (and where you should've run the DDL statements referenced earlier in this document).
We are using SQL Server's sa user in our example. If you have a database user that you'll be using for Engine, just make sure it's in the connection string.
Once you've completed this step, you should be able to play the Engine Console in Visual Studio and see a green passed in the Database Connection test on the dashboard.
Making the Web Server and the Filesystem Get Along
In order to get import working, you'll need to make sure the web server has somewhere on the filesystem to put content files. There are four values you'll want to set in order for Engine to be able to import successfully:
- WebPathToContentRoot: the URL (can be an absolute path without the protocol or server) to web-accessible folder where your content will live
- FilePathToContentRoot: the full filesystem file path to where the same content exists on the server
- FilePathToUploadedZippedPackage: the full filesystem file path to where zipped packages will be uploaded before being unzipped, imported, and moved to the content root
- UrlToUploadResources: the URL (can be an absolute path without the protocol or server) indicating where your upload mechanism lives
In the case of the two filepaths, these need to be writable by the web server.
Here's how this section of the appSettings block looks in SCORMEngineSettings.config for our Vanilla integration:
<!-- Upload Import Control -->
<add key="WebPathToContentRoot" value="/ScormEngineInterface/tools/test-courses"/>
<add key="FilePathToContentRoot" value="C:\Documents and Settings\DevUser\Desktop\SCORM Engine Integration Template\ScormEngineInterface\tools\test-courses"/>
<add key="FilePathToUploadedZippedPackage" value="C:\Documents and Settings\DevUser\Desktop\SCORM Engine Integration Template\ScormEngineInterface\tools\test-courses\uploads"/>
<add key="UrlToUploadResources" value="/ScormEngineInterface/scripts/EngineUtils/UploadImportControl/"/>
Once you've got these values set up in your configuration file with permissions to the directories such that the web server can write to them, you should have another passed test in the console dashboard.
Implementing the Integration Layer
As part of our delivery, we ship you 4 files that constitute your integration layer:
- a file containing your external configuration, i.e., information your LMS might want to use in Engine that is available to all integration functions (VanillaExternalConfiguration.cs in our example)
- a file containing your external package ID, the keys we'll use to uniquely identify your content during import and launch (VanillaExternalPackageId.cs in our example)
- a file containing your external registration ID, the key(s) we'll use to uniquely match a learner to a launch (VanillaExternalRegistrationId.cs in our example)
- a file containing your integration override functions (VanillaIntegration.cs in our example)
We should have delivered you versions of each of the external files with the keys already populated, but you will always be able to see their status in console.
And you'll have stubs of the core override functions in your main integration file, but you will need to complete implementation of these overrides in order to have a complete integration between your LMS and Engine.
When Worlds Collide: The Engine Override Functions
The core override functions go in our main integration file, VanillaIntegration.cs:
- GetLearnerInformation(): gets the learner name and ID from the host LMS for storage in Engine
- AddExternalPackage(): required when you're computing the package keys in the host LMS rather than passing them directly via the upload/import control
- RollupRegistration(): persists data to the Engine server at regular intervals (by default every 10 seconds)
- RollupRegistrationOnExit(): persists data only upon completion of the content (e.g., return to LMS)
- GetExternalPackageIdFromExternalRegId(): required to correctly identify content in integrations where the registration keys do not include the package keys
As mentioned above, we provide stubs for each of these functions upon delivery of your integration code (including only definitions for the ones that matter for your integration; you might not need GetExternalPackageIdFromExternalRegId(), for instance), but you'll likely need to customize them. For instance, if you're tracking learning in your LMS, you'll need the logic for storing that tracking information in your non-Engine LMS database to be included in your rollup override(s).
Your First Import
As a part of your Engine delivery, you'll find an example import file (import.aspx) in /ScormEngineInterface/tools/console. This is how console will allow you to test your imports, but you can also model your integrated import process on it. It uses an upload/import control we provide that is available for you to use to integrate imports however you like.
Here is how the import screen will look in console (and if you use our default upload/import control in your final integration):
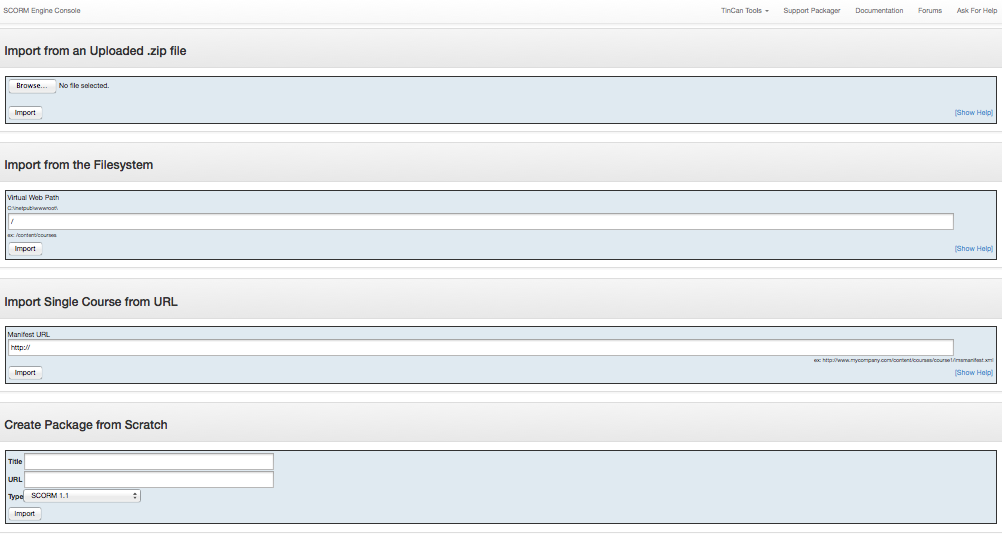
When you import, you might already have your external package ID available. If so, you can just pass that in to the import process. In console, if you've got a package ID already, you add it to the query string on import.aspx. E.g.,
import.aspx?package=CourseId|123
Then reload import.aspx. After you reload, when you submit the import form it will be able to grab the package ID from the query string and complete the import.
If you don't have your external package ID at the time of import, and instead prefer that the import process generate one for you, we provide an overridable method called AddExternalPackage(). In this method, you can grab the title and description and whatever else you might need from the manifest and store them to your host system while also generating the package ID.
We provide you with sample code for this method. If you're not using it, we typically leave the code commented out and throw an exception to remind you that you need to pass in the package ID during the import process.
Updating Content
Engine comes with content versioning built in, so you can update a package in place without creating multiple parallel instances of your content. If you click Update Package under a course title in console dashboard, you'll see a screen like this:
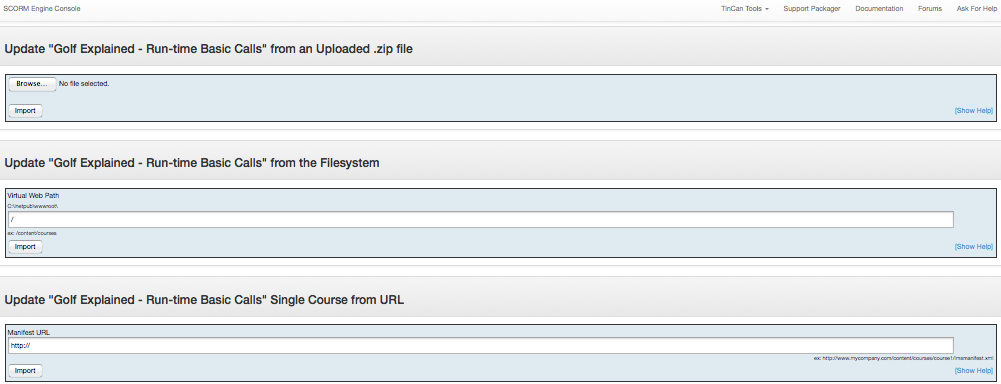
You'll notice there are only three options now. It doesn't really make sense to create a package from scratch if you're in the process of updating a pre-existing package.
Your First Launch: Preview
After you've successfully imported a course, even if you haven't completed your core overrides for tracking learning, you're ready to test a preview launch.
To test a preview launch, click on the title of an imported course. You'll see a link for “Preview.” Click it, and you should be able to launch the course without worrying about learner information or rollup.
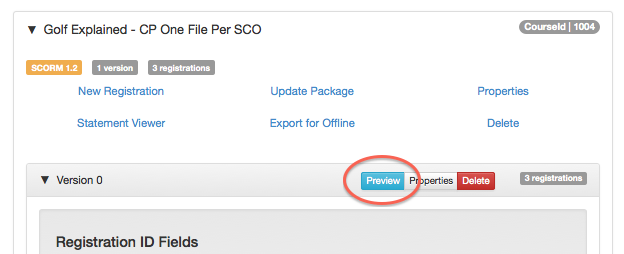
If you've gotten this far, you're in very good shape. It's sort of a metaphorical passed.
Your Second Launch: Tracking
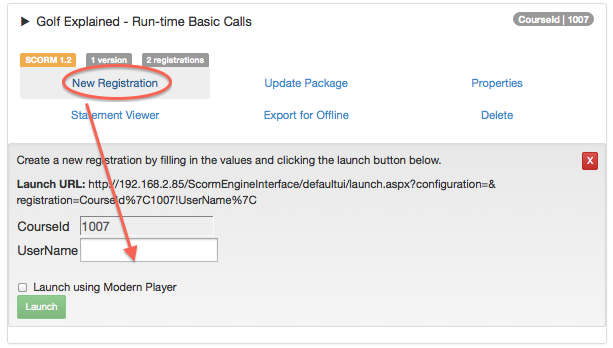
After you've completed your GetLearnerInformation() and rollup override(s), you should be ready to test launching again, this time with Engine tracking learning.
To test a tracked launch, click the “New Registration” link beneath the title of one of your imported courses in the console dashboard. Now you should be able to track learning, which will include launch history and the ability to relaunch the content corresponding to this registration.
Beyond Console: Two Integrations Enter, One Integration Leaves
We provide Engine console to give you a snapshot of the functionality of your Engine setup and to serve as a sort of integration assistant. Getting it set up is almost like completing pre-integration.
At this point, all that likely remains for you to have a multi-standard-conformant LMS is to integrate the upload/import controls as tightly as you'd like with your LMS and to ensure that your production environment is configured successfully (assuming that you set up Engine in a development environment to begin with).
If you started with console running in a dev environment, you'll still be able to run it in your production environment since it will run anywhere a successful ScormEngineInterface installation lives.